By continuing you agree to our use of cookies. You are able to update your settings at any time.

Cookie Policy

A cookie, also known as an HTTP cookie, web cookie, or browser cookie, is a piece of data stored by a website within a browser, and then subsequently sent back to the same website by the browser. Cookies were designed to be a reliable mechanism for websites to remember things that a browser had done there in the past, which can include having clicked particular buttons, logging in, or having read pages on that site months or years ago.

Strictly Necessary Cookies

These cookies cannot be disabled

These cookies are necessary for the website to function and cannot be switched off. They are normally set in response to your interactions on the website e.g. logging in etc.

Cookies:
  • .ASPXANONYMOUS
  • .DOTNETNUKE
  • __RequestVerificationToken
  • authentication
  • CV_Portal
  • CV_Store_Portal_Cart_21
  • CV_USER
  • dnn_IsMobile
  • language
  • LastPageId
  • NADevGDPRCookieConsent_portal_21
  • userBrowsingCookie

Performance Cookies

These cookies allow us to monitor traffic to our website so we can improve the performance and content of our site. They help us to know which pages are the most and least popular and see how visitors move around the site. All information these cookies collect is aggregated and therefore anonymous. If you do not allow these cookies we will not know when you have visited or how you navigated around our website.

Cookies:
  • _ga
  • _gat
  • _gid

Functional Cookies

These cookies enable the website to provide enhanced functionality and content. They may be set by the website or by third party providers whose services we have added to our pages. If you do not allow these cookies then some or all of these services may not function properly.

Cookies:

Currently we are not utilizing these types of cookies on our site.

Targeting Cookies

These cookies may be set through our site by our advertising partners. They may be used by those companies to build a profile of your interests and show you relevant adverts on other sites. They do not store directly personal information, but are based on uniquely identifying your browser and internet device. If you do not allow these cookies, you will experience less targeted advertising.

Cookies:

Currently we are not utilizing these types of cookies on our site.

Shoulder Harness / torso height

Shoulder Harness Fitment

Every Hill People Gear pack uses the same shoulder harness, and needs to be adjusted so the harness rides in the correct position front to back. The HPG shoulder harness is designed to drape the shoulders and spread the load across a wide surface area without impinging on the trapezius or brachial plexus.

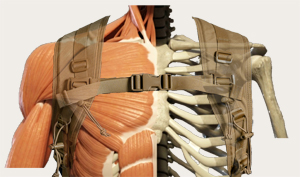
To set the harness, you need to lengthen or shorten the torso height so that the bottom of the pack settles into the lumbar curve and the rear center of the shoulder harness settles in 1-2" below the cervical portion of the spine as depicted in the image above and the video below. This fitment is the same regardless of how tall the pack is or whether it has load lifters. Connor, Aston House, Ute, and qui-Ya packs will all stick up above the harness on the body of an average height person. The critical dimension is between the bottom of the pack and the rear center of the shoulder harness.

If you are using a pack belt, the shoulder harness should be lightly resting on your shoulders. It's there more for stabilizing the pack than bearing any weight. If you can't easily get a couple fingers under the harness on your belted pack you need to lengthen either the torso length, harness front straps, or both.

On the front of the harness, you do not want to overtighten the bottom straps. The harness is meant to drape in such a way that the pack settles into your lumbar. The point of a sternum strap is to take the pressure off of your brachial plexus. As such, the sternum strap should be level with your brachial plexus which is about 2" below your collar bones. Tension the sternum strap just enough to take the pressure off.

Waist Belt Placement

Proper Belt Placement

A proper load bearing waist belt locks the load into your lumbar area and also settles the load around the top of your pelvis. The ultimate goal is to load your long bones (femur on down) instead of your spine. Just like the HPG shoulder harness, the HPG waist belts (Prairie and Recon) are designed to drape the skeleton and distribute load over a wide surface area. In general, the correct height for the waist belt is half above the illiac crest, half below the illiac crest. Once positioned, cinch down as tightly as possible so the load settles evenly around the circumference of your pelvis.

Start the process without anything attached to your belt. Once everything is set up and adjusted properly, add accessories carefully and pay attention to whether they are causing discomfort. There are LOTS of variables involved with different MOLLE pouches and different people's bodies. What is comfortable will also vary from pack to pack and Prairie to Recon Belt.

Note that the Prairie Belt is designed with two sets of removable pads. This is because everyone's body is different. For heavy loads, most people will prefer both pads. However, some people will find the belt more comfortable with just the thick cushy pads or just the thin high density pads.

Pack Parts

Stay Adjustment

The purpose of the frame elements (stays, framesheet, closed cell foam) is to direct the pack's center of gravity into the lumbar area. Even without a belt, a properly bent stay will direct some of the load into the lumbar area. With a belt, that same stay will also load the pelvis in addition to the lumbar area.

The stock bend on Hill People Gear stays is meant to work OK for most folks. However, just about everyone will benefit from fitting their stays to their own unique spinal profile. If you purchase from us in our store in downtown Grand Junction, we'll fit it for you. If you've purchased online, you'll need to do it yourself. With the high quality 7000 series aluminum we use, you can do this yourself over your knee or a log along the trail. Once set, it won't flatten out although it will have a springy quality which helps absorb impact. Follow these steps to bend your stays to your back:

  1. The frame elements (and also the bottom of the pack on the small frameless packs) start at the bottom of the lumbar curve
  2. With a single stay out of the pack, set it against your back alongside your spine. Bend it to match your lumbar curve.
  3. Towards the top of your lumbar curve (which will also be a little below your scapula) allow the stay to keep bending outwards away from your lumbar curve
    1. If you're fitting an Umlindi stay, that's about where it ends.
  4. For all of the taller stays, bend the top of the stay gently back towards your body once it is an inch or so behind your scapula. You don't want it right on your spine at this point, but you want it to mirror the spine somewhat.
  5. For the larger 2 stay packs, bend the second stay to match the first stay.
Removing Your Pack
  1. If your pack has load lifters, reach up and loosen them
  2. If your pack has delta straps, reach back and loosen them
  3. If your pack has a waist belt, loosen it
  4. Unbuckle your sternum strap
  5. If you are using kit bag lifter straps, unclip them
  6. Unbuckle your belt
  7. DO NOT LOOSEN YOUR SHOULDER STRAPS once you've got them properly adjusted, leave them alone
Putting On Your Pack
  1. If it is a heavy pack, lift it in front of you and set it on your knee
  2. Slip into the shoulder harness
  3. If it is a belted pack:
    1. buckle the belt
    2. lean forward at the waist to move the belt up your body
    3. while leaned forward, tighten your belt as much as possible
    4. stand upright. the shoulder straps should only be lightly resting on your shoulders, not bearing any load
  4. Buckle the sternum strap and tighten a touch if need be
  5. If you are running Kit Bag Load Lifters, clip them in.
  6. If it is a belted pack, tighten your delta straps. On an Umlindi, this is crucial. Doing so should remove almost all the load from your shoulders
  7. If your pack has load lifters, snug the load lifters to lift your shoulder harness off your shoulders and turn the top of the pack into a little bit of an s-curved spring
  8. Walk a ways and then snug everything up as necessary